

Complete Ussing Chamber Guide

Complete Ussing Chamber Guide: Protocols, TEER, and Troubleshooting
Short version: This Ussing Chamber guide shows how to measure PD, Isc, and TEER, run flux assays, choose hardware, prep solutions, and troubleshoot fast—whether you’re working with native tissue or monolayers.
Last updated: August 12, 2025
1) What an Ussing Chamber Measures & Why
Goal. Quantify transepithelial transport and barrier integrity across a tissue or monolayer separating apical and basolateral solutions.
An Ussing chamber is essentially a controlled environment that lets you watch how ions and molecules move across an epithelial barrier. When you place tissue or a monolayer between two compartments, you can measure voltage (PD), current (Isc), and resistance (TEER). PD reflects the natural voltage the tissue creates at rest. Isc tells you how much active ion transport is happening when you force the voltage to zero. TEER shows how tight or leaky the barrier is. Together, these measurements help you understand how the tissue is functioning—whether it’s absorbing nutrients, secreting ions, maintaining a barrier, or responding to drugs and disease models. Instead of guessing about tissue health or transport behavior, the Ussing chamber gives you the numbers that explain what’s actually happening at the cellular level.
Primary electrical readouts
-
PD (Potential Difference, mV): open-circuit voltage across the epithelium.
-
Isc (Short-Circuit Current, µA/cm²): net active ion transport when PD is clamped to 0 mV.
-
TER / TEER (Ω, Ω·cm²): barrier tightness; higher values = tighter junctions.
-
TEER is area-normalized:
TEER = (Rsample − Rblank) × Area
-
Flux readouts (chemical)
-
Paracellular tracer flux (e.g., mannitol, FITC-dextran): tight-junction permeability.
-
Transcellular flux (e.g., glucose, amino acids): transporter-mediated uptake.
-
Apparent permeability (Papp) for a solute:
Papp = (dQ/dt) / (A × C0)
Why this matters. These metrics underpin research in CFTR/ENaC physiology, IBD, celiac disease, diarrhea models, airway hydration, skin barrier, and drug absorption/toxicity.
2) The Physics: Making Sense of PD, Isc, and TEER
Let’s dive into the underlying physical principles so you don’t just “press buttons.” Ohm’s law (V = I×R) applies directly here: voltage equals current times resistance—so if you know two, you can calculate the third. When you clamp the tissue to 0 mV, the current that flows (Isc) represents net ion movement because you’ve removed any voltage driving force. TEER is the electrical resistance of the tissue and reflects tight junction integrity and general barrier quality.
You also need to account for real-world factors like series resistance from the solution or electrode setup. Placing sensing electrodes close to the tissue reduces this error. It’s also important to understand the difference between DC measurements (step current and record voltage change) and AC impedance (sinusoidal signals) to separate resistive versus capacitive contributions. Finally, you’ll get cleaner data by subtracting blank resistance, correcting for liquid junction potentials, and normalizing everything to the exposed tissue area. These steps ensure the numbers you generate reflect the biology—not the hardware.
-
Ohm’s Law (tissue):
V = I × R.When voltage-clamped to 0 mV, the injected Isc equals net electrogenic transport (e.g., CFTR-mediated Cl⁻ secretion minus ENaC Na⁺ absorption).
-
Series resistances (solution + electrodes + bridges) sit outside the tissue. Good chamber design places voltage-sensing electrodes close to the tissue to minimize series drop.
-
AC vs DC TEER.
-
DC pulse/step: inject a small current briefly; compute ΔV/ΔI.
-
AC impedance: a small sinusoid (e.g., 1 kHz) can isolate epithelial resistance and capacitance if supported by the electronics.
-
Corrections to apply
-
Liquid junction potentials (LJP): match ionic strength; use KCl agar bridges.
-
Offset correction: short the sensing electrodes in symmetric solutions; set baseline PD ≈ 0 mV before mounting tissue.
-
Area normalization: always report µA/cm² (Isc) and Ω·cm² (TEER) using the true aperture area.
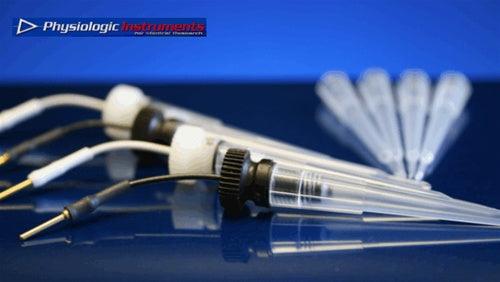
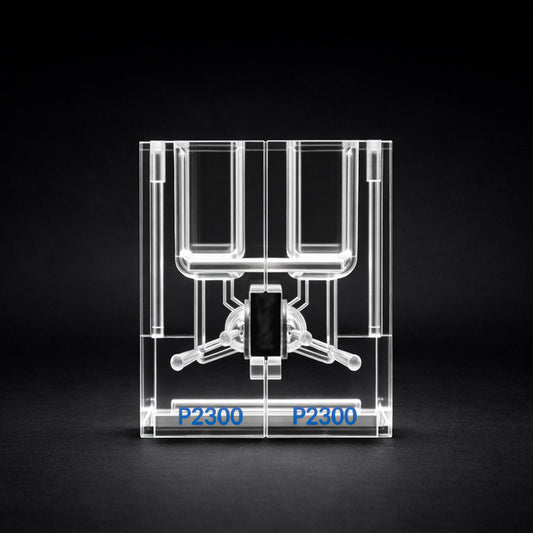
3) Ussing Chamber Hardware: What Each Component Does
Each piece of the Ussing chamber exists for a reason, and understanding how the hardware works helps you get reliable data. The chamber body and sliders hold the tissue in place and define the surface area you’re measuring. Gaskets and seals prevent leaks that can completely distort readings. Electrodes and their agar bridges transmit voltage and current without contaminating the tissue environment. Temperature, oxygenation, and perfusion systems keep the tissue alive and physiologically stable throughout the experiment. And the amplifier or clamp is the brain of the operation, injecting current, measuring voltage, and recording every electrical change. When all of these components are configured correctly, you get stable baselines, consistent measurements, and results you can trust. Misconfigure even one element—wrong bridge length, loose gasket, cold solution—and your data quality can collapse.
Chambers and Sliders (Apertures)
- Classic split-halves: maximal flexibility; more handling skill required.
- EasyMount: guided, fast, repeatable mounting; reduces tissue damage and variability.
- Aperture determines sensitivity and normalization (common: 0.071–0.64 cm²).
- Gaskets (thickness, compliance) control compression; over-tightening causes edge leaks or ischemia.

Electrodes & Bridges
- Ag/AgCl electrodes via agar–KCl bridges (e.g., 3 M KCl in 2–3% agar).
- Keep sensing electrodes close to tissue; current electrodes further out.
- Maintenance: re-chloride Ag wires periodically; replace cloudy or dehydrated bridges.
Perfusion, Gas, Temperature
- Gas lift with 95% O₂ / 5% CO₂ (carbogen) for bicarbonate buffers; gentle bubbling reduces unstirred layers.
- Perfusion (constant or interval) prevents depletion/accumulation; maintains set drug concentrations.
- Temperature: 37 °C with in-block or in-line heaters and calibrated probes; even 1–2 °C drift changes Isc/TEER.
Clamps and DAQ
- Voltage–current clamps (single/multi-channel) measure PD, inject current, calculate Isc/TEER automatically.
- Data acquisition: time-stamped events, protocol steps, and annotations improve reproducibility.
Looking for systems? See Ussing Chamber Systems and the Ussing Chamber Protocol.
4) Ussing Chamber Solutions & Recipes (working examples)
The solutions you use are just as important as the hardware. Buffers like Krebs-Ringer bicarbonate provide the ions, pH, and osmotic balance the tissue needs to behave normally. If the chemistry is off, the physiology will be off. This section explains how to prepare balanced solutions, oxygenate them, warm them, and verify pH before starting. It also covers how asymmetrical solutions or specific substrates can be used to probe particular transport pathways.
Pharmacological agents—like amiloride, forskolin, IBMX, bumetanide, or glucose—help reveal which channels and transporters are active. Tracers such as FITC-dextran or radiolabeled solutes allow you to measure permeability directly. The takeaway is simple: the buffer isn’t just “salt water.” It’s a controlled chemical environment that determines what the tissue will do and what you’ll be able to measure.
Verify with your IACUC/IRB/SOP. Buffer chemistry affects LJPs, transport driving forces, and viability.
Krebs–Ringer Bicarbonate (typical)
- NaCl 117 mM, KCl 4.7 mM, CaCl₂ 2.5 mM, MgSO₄ 1.2 mM, KH₂PO₄ 1.2 mM, NaHCO₃ 25 mM, Glucose 10 mM
- Gas with 95% O₂ / 5% CO₂, 37 °C
Mannitol/Glucose Osmotic Pair (symmetric osmolality)
- Serosal: glucose 10 mM; apical: mannitol 10 mM (or vice versa) to isolate transport asymmetries.
Common modulators
- Amiloride (apical) → ENaC block (↓ Na⁺ absorption)
- Forskolin/IBMX → ↑ cAMP → ↑ CFTR-mediated Cl⁻ secretion
- Bumetanide (basolateral) → NKCC1 block (limits Cl⁻ loading → ↓ secretion)
- CFTRinh-172 → inhibits CFTR currents
Tracer examples for flux
- Paracellular: mannitol, FITC-dextran (3–4 kDa)
- Transcellular: radiolabeled glucose, amino acids (observe safety protocols)
5) Ussing Chamber Protocol: Step-by-step SOP (field-tested)
Running an Ussing chamber experiment is a sequence of carefully timed steps. First, you verify everything—bridge offsets, temperature, gas flow, and solution quality. Then you prepare the tissue or monolayer, ensuring it isn’t torn, dehydrated, or mounted under tension. During mounting, proper alignment and sealing are critical; even a small wrinkle can create leaks or shunt pathways that ruin data. After the tissue is in place, you allow the system to equilibrate until the baseline voltage or resistance stabilizes. Only then do you apply any treatments or stimuli.
If your experiment includes flux measurements, you’ll collect timed samples from the receiving side. At the end of the run, you check baselines again, record all deviations, and validate that the tissue remained intact. Following this structure gives you reproducible results instead of guesswork.
A. Pre-run checks (10–20 min)
- Electrode offset: immerse both sensing tips in the same buffer; adjust PD ≈ 0 mV.
- Bridge health: gentle suction → free flow; no bubbles.
- Temperature: stabilize chambers at 37 °C (±0.2 °C).
- Solutions: pre-warm and gas; verify pH (7.3–7.4) and osmolality (±5 mOsm).
- Blank TER: assemble with a gasket/no tissue if SOP calls for Rblank.
B. Tissue/Insert prep
- Native tissue: dissect carefully; open along mesenteric border; trim to aperture.
- Monolayers (e.g., Transwell): rinse, equilibrate 15–30 min; use adapter sliders if needed.
C. Mounting (2–5 min with EasyMount)
- Align tissue (mucosa → apical, serosa → basolateral).
- Compress to seal—no wrinkles or edge extrusion.
- Start perfusion/gas; wait 10–20 min for baseline stabilization.
D. Baseline acquisition
- Record PD, Isc at steady state (drift < 1%/min).
- Measure TER via ΔI or AC routine; compute TEER.
E. Interventions (examples)
- Amiloride (apical) → ↓ Isc (blocks ENaC)
- Forskolin/IBMX (bilateral or basolateral) → ↑ Isc (activates CFTR)
- Bumetanide (basolateral) → ↓ secretory current (blocks NKCC1)
- Test compounds apical/serosal; track PD/Isc over time; collect samples for flux.
F. Flux sampling
- Define intervals (e.g., every 10–15 min); maintain sink conditions (receiver < 10% of donor concentration).
- Calculate Papp and clearance; normalize to area and time.
G. Close-out & QC
- Recheck offset and blank to confirm stability.
- Log temperature/pH deviations; inspect tissue for edge damage.
6) Ussing Chamber Data Analysis, Normalization & Reporting
Collecting data is only half the work—you need to process it correctly to extract meaning. This section explains how to convert raw numbers into standardized values like Isc density (µA/cm²) and TEER (Ω·cm²). These normalizations allow comparisons across tissues and apertures. You also learn how to present time-course traces clearly, annotate events such as drug additions, and choose appropriate statistics.
Proper reporting includes documenting solution composition, tissue source, aperture size, baseline values, temperature, electrode configuration, and any anomalies observed during the run. The goal is transparency and reproducibility. When you analyze and report your data properly, other researchers can interpret your results without guesswork—and you can reliably compare experiments across days, teams, or projects.
Normalization
- Isc to µA/cm²: divide by aperture area.
-
TEER to Ω·cm²:
(Rsample − Rblank) × Area - Report means ± SEM, n animals, n tissues/animal; avoid pseudo-replication.
Typical plots
- Time course of Isc with annotated additions.
- TEER trajectory pre- and post-treatment.
- Flux vs time; bar charts of Papp.
Stats
- Paired analysis when the same tissue serves as its own control.
- Mixed models for multi-animal, multi-tissue designs.
- Pre-define exclusion criteria (leaks, unstable baselines).
7) Ussing Chamber Troubleshooting (fast diagnostics)
Every lab eventually runs into odd signals—drifting baselines, noisy Isc traces, unstable TEER, or unexpected currents. This section shows how to diagnose issues quickly by linking symptoms to likely causes. For example, noise may come from bubbles crossing the aperture, loose electrode connections, or grounding problems. A drifting baseline can indicate temperature instability, tissue deterioration, or contaminated bridges. Extremely low TEER may result from leaks or over-compressed tissue.
This troubleshooting guide teaches you to think systematically: start with hardware, move to solutions, then to tissue preparation. This structured approach saves hours of confusion and prevents you from discarding experiments that could have been rescued with a small correction.
| Symptom | Likely Cause | Fix |
|---|---|---|
| Large PD drift | Electrode offset, LJP changes, temp drift | Re-zero in symmetric buffer; verify 37 °C; match buffer composition |
| Noisy Isc | Bubbles at tissue, poor ground, vibration | Degas solutions; remove bubbles; secure cables; isolate pump |
| Low/unstable TEER | Edge leak, over-compression, tissue damage | Remount with fresh gasket; reduce clamp force; trim cleaner edge |
| Isc saturates / can’t clamp | Bridge blockage, current electrode polarization | Replace bridges; clean current electrodes; check clamp compliance |
| Zero response to agonists | Poor viability, wrong side, expired reagents | Confirm viability; verify side; prepare fresh drugs |
8) Experimental Design by Tissue Type (Ussing Chamber)
Not all tissues behave the same, and your protocol needs to match the biology. This section describes what to expect when working with intestinal mucosa, airway epithelia, skin, bladder, monolayers, and other tissues. Each one has distinct baseline PD, Isc, and TEER characteristics. Some require gentler mounting, some require gas control, and others need specific inhibitors or agonists to reveal meaningful physiology. For example, airway models often follow an amiloride → forskolin → bumetanide sequence to isolate ENaC and CFTR activity. Skin has naturally high TEER and may require longer equilibration. Intestinal tissues are more fragile and sensitive to mechanical stress. Adapting the experiment to the tissue ensures your data reflects biology—not artifacts from forcing every tissue into the same protocol.
Intestine/Colon
- Consider indomethacin pre-incubation if prostaglandins confound responses.
- Gentle mucosal cleaning; avoid epithelial tears.
Airway (trachea/bronchus)
- ENaC block with amiloride (apical); CFTR activation with forskolin/IBMX; observe bumetanide sensitivity.
Skin
- Thicker, higher TEER; ensure robust sealing; allow longer equilibration.
Cultured Monolayers (e.g., Caco-2, primary airway)
- Verify confluence/TEER thresholds; mind filter support resistance (subtract blank); use adapter sliders.
9) Quality & Reproducibility Checklist
Good electrophysiology depends on repeatability, and this section provides a checklist to help you achieve consistent results. Before the experiment, confirm electrode offsets, ensure solutions match in pH and osmolality, and verify temperature stability. During mounting, check for wrinkles, leaks, and proper orientation. Throughout the run, watch for baseline drift, bubble formation, or changes in perfusion. Afterward, validate blank resistance again and document anything unusual. These checkpoints help you spot problems early and create datasets that stand up to peer review, internal QC, and long-term comparison. Consistency is what separates interpretable science from noise.
- Chamber model, aperture, gasket lot recorded
- Temperature/pH logs within range
- Electrode offset before/after
- Baseline stability (<1%/min drift)
- Correct side additions and timestamps
- Area normalization documented
- Exclusion criteria predefined and applied
- Raw files archived (time series + event log)
10) Safety & Compliance
Ussing chamber work involves biological tissues, chemicals, heated components, and sometimes radiotracers, so this section explains how to stay safe and compliant. You’ll need the appropriate approvals for human or animal tissue, follow biosafety rules for handling and disposing of specimens, and understand any chemical hazards associated with inhibitors or tracers. Gas cylinders, heating blocks, and electrical equipment also require safe operation. These guidelines protect you, your lab, and your institution—and ensure your work meets legal and ethical standards.
- Radiotracers: licensing, shielding, wipe tests, segregated waste.
- Human/animal tissues: IRB/IACUC approvals, appropriate biosafety precautions.
- Chemical hazards: bumetanide, forskolin, DMSO controls; maintain SDS access.
11) Selecting & Budgeting the Right Ussing Chamber System
Choosing a Ussing chamber system is a strategic decision, not just a purchase. This section walks through how to match your scientific goals with the hardware you select—number of channels, aperture sizes, perfusion options, temperature control, electrode systems, and the clamp electronics themselves. You also learn how to assess long-term needs like throughput, expansion plans, and consumable costs. A thoughtful selection process prevents under-buying, over-buying, or ending up with equipment that doesn’t align with your experimental workflow. Budgeting isn’t just about price; it’s about purchasing the system that supports the science you plan to do for years.
Match to goals
- Teaching / pilot work: single channel, manual clamp, basic perfusion.
- Core lab / pharma: multi-channel (4–8+), automated routines, integrated DAQ.
- Barrier screening: stable TEER measurement with rapid mounting (EasyMount), reliable perfusion & temperature control.
Cost expectations (configuration-dependent)
Cost expectations vary depending on several factors (number of channels and chamber set-ups). We configure systems by tissue, aperture, and throughput.
12) Ussing Chamber Appendices
These appendices provide tools you’ll return to frequently. The quick-start guide gives a streamlined version of the protocol for training new users or refreshing steps before a run. Calculation sheets show exactly how to compute TEER, Isc density, and permeability values. Reporting templates help standardize how you document experimental parameters and outcomes. Having these references organized in one place ensures clarity and consistency across your team, whether you're running a single chamber or scaling up to multi-channel systems.
A) Quick-start SOP (one page)
- Warm/gas buffers; set 37 °C.
- Zero electrodes in symmetric buffer.
- Mount tissue (no wrinkles, correct orientation).
- Stabilize; record baseline PD/Isc; measure TER → TEER.
- Add modulators (amiloride → forskolin/IBMX → bumetanide, etc.).
- Collect flux samples on schedule; keep sink conditions.
- Close-out: re-check offsets; document exclusions.
B) Common Calculations
-
Isc density:
Isc (µA/cm²) = Iraw (µA) / Area (cm²) -
TEER:
TEER (Ω·cm²) = (Rsample − Rblank) × Area -
Papp:
Papp = (ΔQ/Δt) / (A × C0) -
Conductance:
Gt = 1 / R(normalize to area as needed)
C) Reporting Template (copy/paste)
- Tissue: species/region; monolayer line & passage
- Chamber: model, aperture (cm²), gasket thickness
- Solutions: compositions, pH, temperature; gas mix
- Clamp: model, sampling rate, TEER method (DC/AC)
- Baseline PD/Isc/TEER ± SEM (n animals, n tissues/animal)
- Agonists/antagonists: side, concentration, vehicle control
- Flux: tracer, sampling schedule, Papp calculation
- Statistics: tests, α level, exclusion criteria
13) Ussing Chamber FAQs
The FAQ section answers the practical questions new and experienced users ask most: What does the chamber actually measure? Which aperture size should you use? How do you correctly calculate TEER? Can you measure TEER and Isc in the same experiment? Why is my baseline drifting? These quick answers help clarify common misunderstandings and prevent avoidable mistakes, making it easier for researchers to get reliable data without re-learning the same lessons in every experiment.
FAQs
What does an Ussing Chamber measure?
Primary electrical readouts are PD (mV, open-circuit potential), Isc (µA/cm², short-circuit current with PD clamped to 0 mV), and TEER (Ω·cm², barrier tightness). Tracer flux assays quantify paracellular/transcellular permeability.
PD, Isc, TEER — what’s the difference?
PD: voltage across the epithelium at open circuit.
Isc: net electrogenic transport when clamped to 0 mV.
TEER: area-normalized resistance = (Rsample − Rblank) × Area.
How do I compute TEER correctly?
Measure a blank (gasket/no tissue or insert-only), then compute TEER (Ω·cm²) = (Rsample − Rblank) × Area. Area-normalize, re-zero offsets in symmetric buffer, and match ionic strength to limit LJPs.
How do I normalize Isc?
Isc density (µA/cm²) = Iraw (µA) ÷ aperture area (cm²).
TER vs TEER — which should I report?
TER is raw resistance (Ω). TEER is area-normalized (Ω·cm²) and comparable across apertures. Report TEER for publications and cross-aperture comparisons.
DC vs AC TEER — what’s the difference?
DC injects a small pulse/step and computes ΔV/ΔI. AC impedance uses a small sinusoid (e.g., ~1 kHz) to separate epithelial resistance and capacitance if supported by your electronics.
How long should equilibration take after mounting?
Typically 10–20 minutes with perfusion/gassing and temperature stabilized at 37 °C (±0.2 °C). Wait for stable baselines (drift < 1%/min).
Do I need to subtract filter/insert resistance for monolayers?
Yes. Measure Rblank using the same insert without cells and use TEER = (Rsample − Rblank) × Area.
Which aperture should I use?
Smaller apertures increase sensitivity to small currents but reduce area. Match to tissue size and expected signal (common ranges ≈ 0.071–0.64 cm²).
How do I correct electrode offset and liquid junction potentials (LJP)?
Short the sensing tips in symmetric buffer and set PD ≈ 0 mV before mounting. Use KCl agar bridges (e.g., 3 M KCl, 2–3% agar), keep tips close to the tissue, match ionic strength, and re-chloride Ag/AgCl wires periodically.
What temperature, gas, and pH conditions are recommended?
37 °C with 95% O₂ / 5% CO₂ for bicarbonate buffers; pH 7.3–7.4. Pre-warm and gas solutions; verify with calibrated probes.
What baseline and reporting practices improve reproducibility?
Annotate additions, normalize to area, pre-define exclusion criteria (leaks, unstable baselines), log temperature/pH, and archive raw time-series plus event log.
Which modulators help dissect transport pathways?
Amiloride (apical) blocks ENaC; forskolin/IBMX ↑cAMP to activate CFTR; bumetanide (basolateral) blocks NKCC1 (limits Cl⁻ loading); CFTRinh-172 inhibits CFTR currents.
How often should I sample for flux and compute Papp?
Commonly every 10–15 minutes while maintaining sink conditions (receiver < 10% of donor concentration). Compute Papp = (dQ/dt) ÷ (A × C₀).
Why is my signal noisy or TEER unstable?
Noisy Isc: bubbles, poor ground, vibration—degas solutions, remove bubbles, secure cables, isolate pumps.
Low/unstable TEER: edge leak, over-compression, tissue damage—remount with a fresh gasket and gentler clamp; trim cleaner edges. Also verify 37 °C and offsets/LJPs.
Recommended Equipment for This Research
Ussing Chamber Systems
Complete electrophysiology platforms for epithelial transport and barrier function studies.
Ussing Chamber SystemsUssing Chambers (EasyMount & Classic)
Individual chambers for intestine, airway, renal, and custom tissues.
Ussing ChambersVoltage/Current Clamps (VCC MC8 Series)
Voltage clamp amplifiers for CFTR assays, TEER, and transepithelial measurements.
Voltage/Current Clamps